
 Facebook
 Instagram
 Twitter
 Linkedin
Shaped candles sell because they look different from everything else on the shelf. A marigold, a biscuit or a heart gets far more attention than a plain pillar. The good news is that shaped candles are not hard to make at home once you have the right mould and a little patience. This guide takes you from an empty mould to a finished candle.
Why start with a mould?
Making a candle in a jar is simple, but a mould lets you make decor and gift candles that people remember. It is also useful if you plan to sell. A shaped candle looks premium in photos, and unusual shapes such as a marigold or a nostalgic biscuit stand out in a crowded online market.
What you need
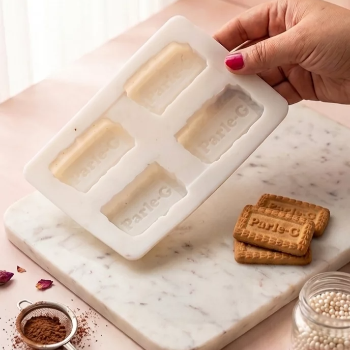
- A candle mould, such as our Marigold Mould (₹295) or Parle G Mould for Candles (₹310)
- Wax. You can use pure beeswax (₹290) or the wax your supplier recommends for moulds
- Wicks that suit your candle's size
- Fragrance, if you want a scented candle. Our guide to essential oils for candle making can help you choose
- Colour, if you want a coloured candle
- A heat-safe jug or a double boiler, a spoon or stirrer, and a thermometer
- A wick holder or a stick to keep the wick centred
- Newspaper or a mat to protect your work surface
Choosing your first mould
- Marigold Mould: popular for Diwali, weddings and festive decor. Marigold is strongly linked with Indian celebrations, so it suits gifts, return favours and table decor.
- Parle G Mould for Candles: a fun nostalgic shape for gifting and for brands that want something people talk about.
For a first attempt, choose the shape you are most likely to use or sell, and make two or three candles before you try colours and scents.
Step-by-step: how to make a shaped candle
Step 1: Prepare the mould
Wipe the inside clean and dry. Dust and water both show on the finished candle. If your mould needs a wick hole or a slit, set it up before pouring.
Step 2: Fix the wick
Pass the wick through the centre and keep it straight and tight. Use a wick holder or rest a stick across the top of the mould to stop it leaning. A wick off to one side makes the candle burn unevenly.
Step 3: Melt the wax
Melt the wax slowly in a double boiler. Never heat wax directly on the flame, and never leave it unattended. Wax is flammable.
Step 4: Add colour and fragrance
Take the wax off the heat and let it cool slightly before adding fragrance, because very high heat burns off the scent. Stir gently for about a minute. Follow the pour temperature and fragrance limits recommended by your wax supplier, as they differ from one wax to another.
Step 5: Pour slowly
Pour in one steady stream and tap the mould lightly to release air bubbles. Keep a little melted wax aside for topping up.
Step 6: Top up if the centre sinks
As the wax cools, the centre often sinks. A small second pour fills the dip and gives a flat base.
Step 7: Let it set completely
Leave it at room temperature for several hours, or overnight for bigger candles. Don't put it in the fridge, because quick cooling can crack the candle or make the surface rough.
Step 8: Demould and finish
Ease the candle out gently. Trim the wick to about 5 mm. If you see small marks, a light pass with a warm spoon or a hairdryer on low can smooth the surface.
Common mistakes and how to fix them
- Air bubbles on the surface: pour slowly and tap the mould after pouring.
- Sinking centre: top up with a second small pour.
- Weak scent: the wax was too hot when you added the fragrance.
- Candle sticks in the mould: it hasn't set fully. Wait longer.
- Cracks: it cooled too fast or the wax was too hot when poured.
- Uneven burn: the wick was off-centre or the wrong size.
Safety tips
- Always melt wax in a double boiler, never over a direct flame.
- Keep water away from hot wax.
- Wear an apron and keep children and pets out of the room.
- Keep a lid or a fire blanket nearby.
- Never pour leftover wax down the sink, as it hardens and blocks pipes.
Cleaning and storing moulds
Let leftover wax cool, then wipe the mould with a soft cloth. Avoid sharp tools that scratch the surface, because scratches show up on every candle you make afterwards. Store moulds in a cool, dry place.
From hobby to small business
Many home makers begin with one mould and grow from there. Festive shapes sell well before Diwali, Raksha Bandhan and Ganesh Chaturthi, and gift-ready sets do well all year. If you are thinking about selling, read our complete guide to starting a candle business from home. To see what customers are buying, browse top candle trends in India for 2026 and our Diwali 2026 candle ideas.
Before you sell, test each new design several times. Burn a sample all the way down and check that it burns evenly, doesn't smoke and doesn't drip badly.
Prefer to buy instead of making?
If you'd like ready-made shaped candles, see the Modak Candle Pack, Ladoo Candle Pack and Tulip Candles. For scent advice, read our guide to the best scented candles in India for 2026.
Buy candle moulds and materials in Ahmedabad
Hettvalley sells candle moulds, pure beeswax and wax sachets to home makers and small brands. Browse our products page or message us on WhatsApp at +91 95126 55030 to check what's in stock. New to candle making? Start with our beginner's guide to making scented candles at home.
FAQs
Can beginners make shaped candles at home?
Yes. With a mould, wax, a wick and a double boiler, most beginners can make a decent candle on the first try.
How long does a candle take to set in a mould?
Several hours at room temperature. Overnight is safest for larger candles.
Why did my candle crack?
Usually because it cooled too fast or the wax was too hot when poured.
Can I use the same mould many times?
Yes, as long as you clean it gently and don't scratch the inside.
Which mould is best for Diwali?
The Marigold Mould is a popular festive choice because marigold is so closely linked with Indian celebrations.
Can I sell candles I make at home?
Many people do. Test your designs well, label them clearly and follow the safety and labelling rules that apply to you.






 Youtube
 Select Date
